I Had 27 MCP Servers and Four Doing the Same Job. So I Built AI Harness Helper
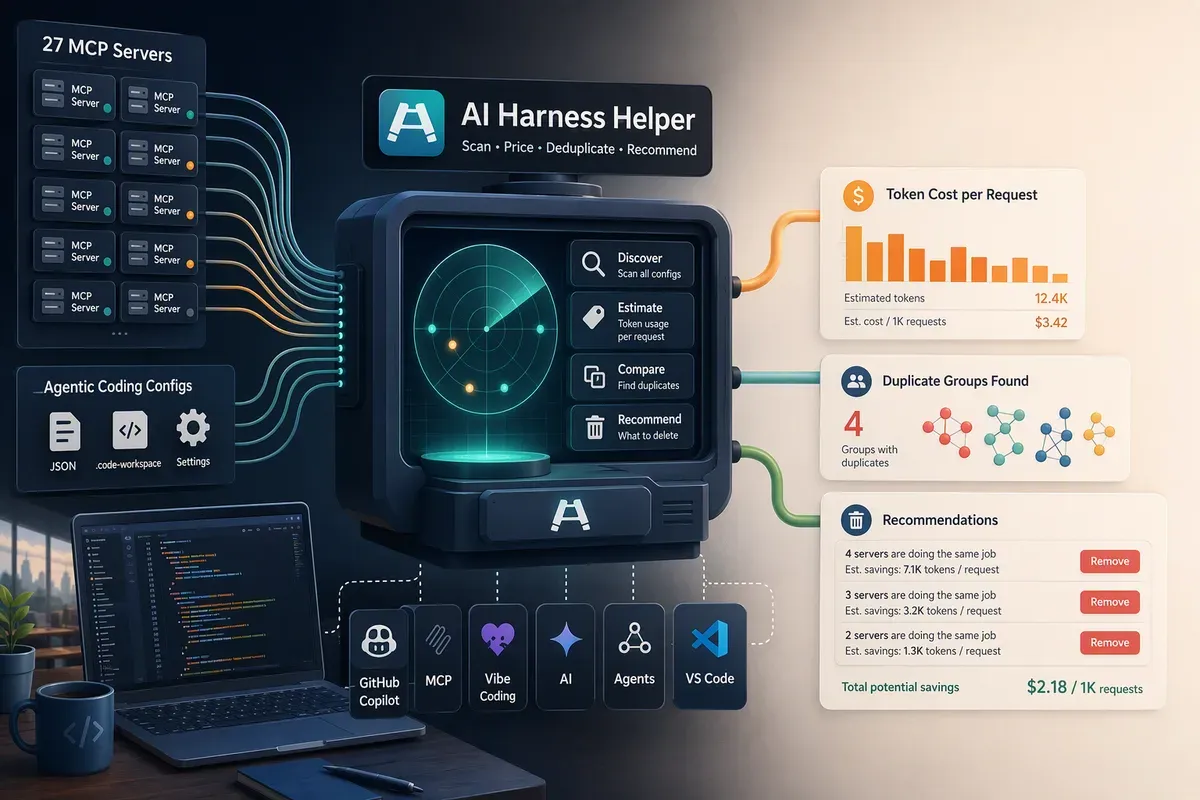
I scanned my own machine last week and found 27 Model Context Protocol (“MCP”) Small helper programs that give a coding assistant extra abilities, like searching documentation or reading your GitHub issues. spread across 18 folders. Four do documentation lookup, and two point at the same web address under different names.
I did not set out to install 27. I’d added tools over time without keeping track of the combined setup.
The settings are spread across several places. Your Software that can read files, edit code, run commands, and check its own work, rather than only suggest changes. each keep their own files. I wanted one view of what I’d configured, where it overlapped, and how much context the instruction files used. So I built AI Harness Helper.
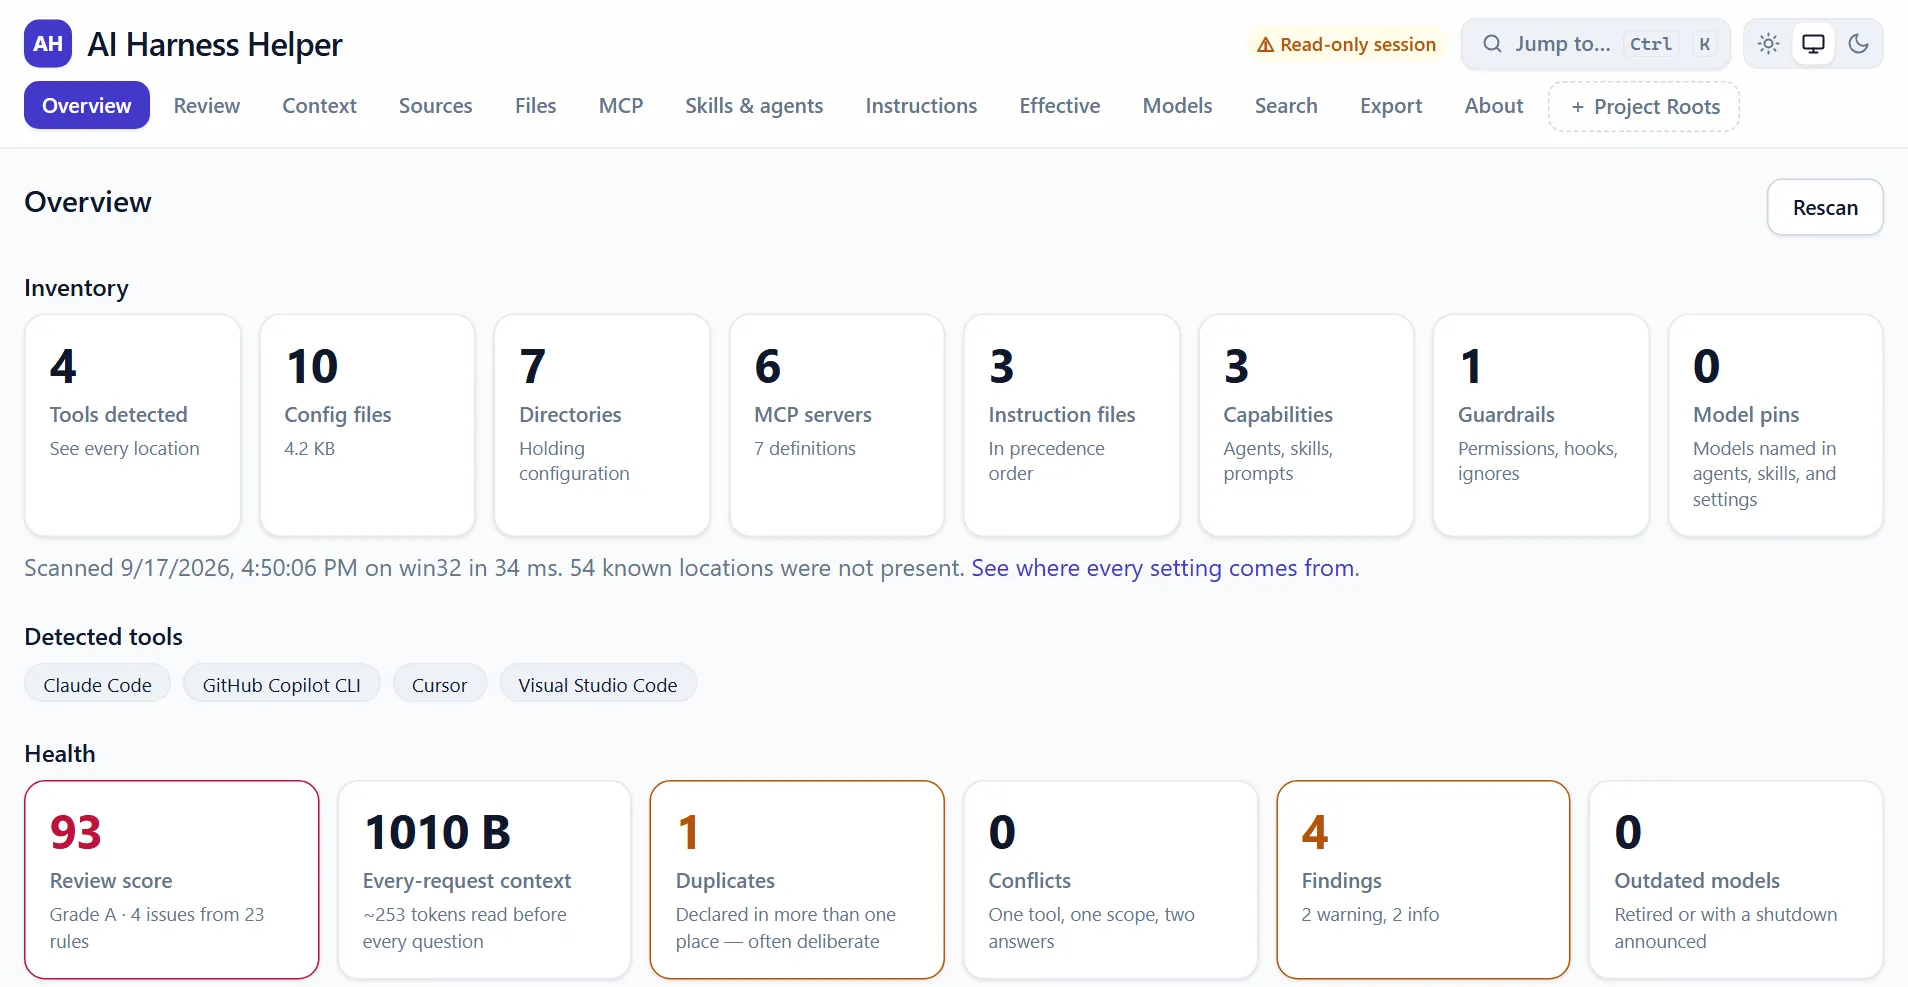
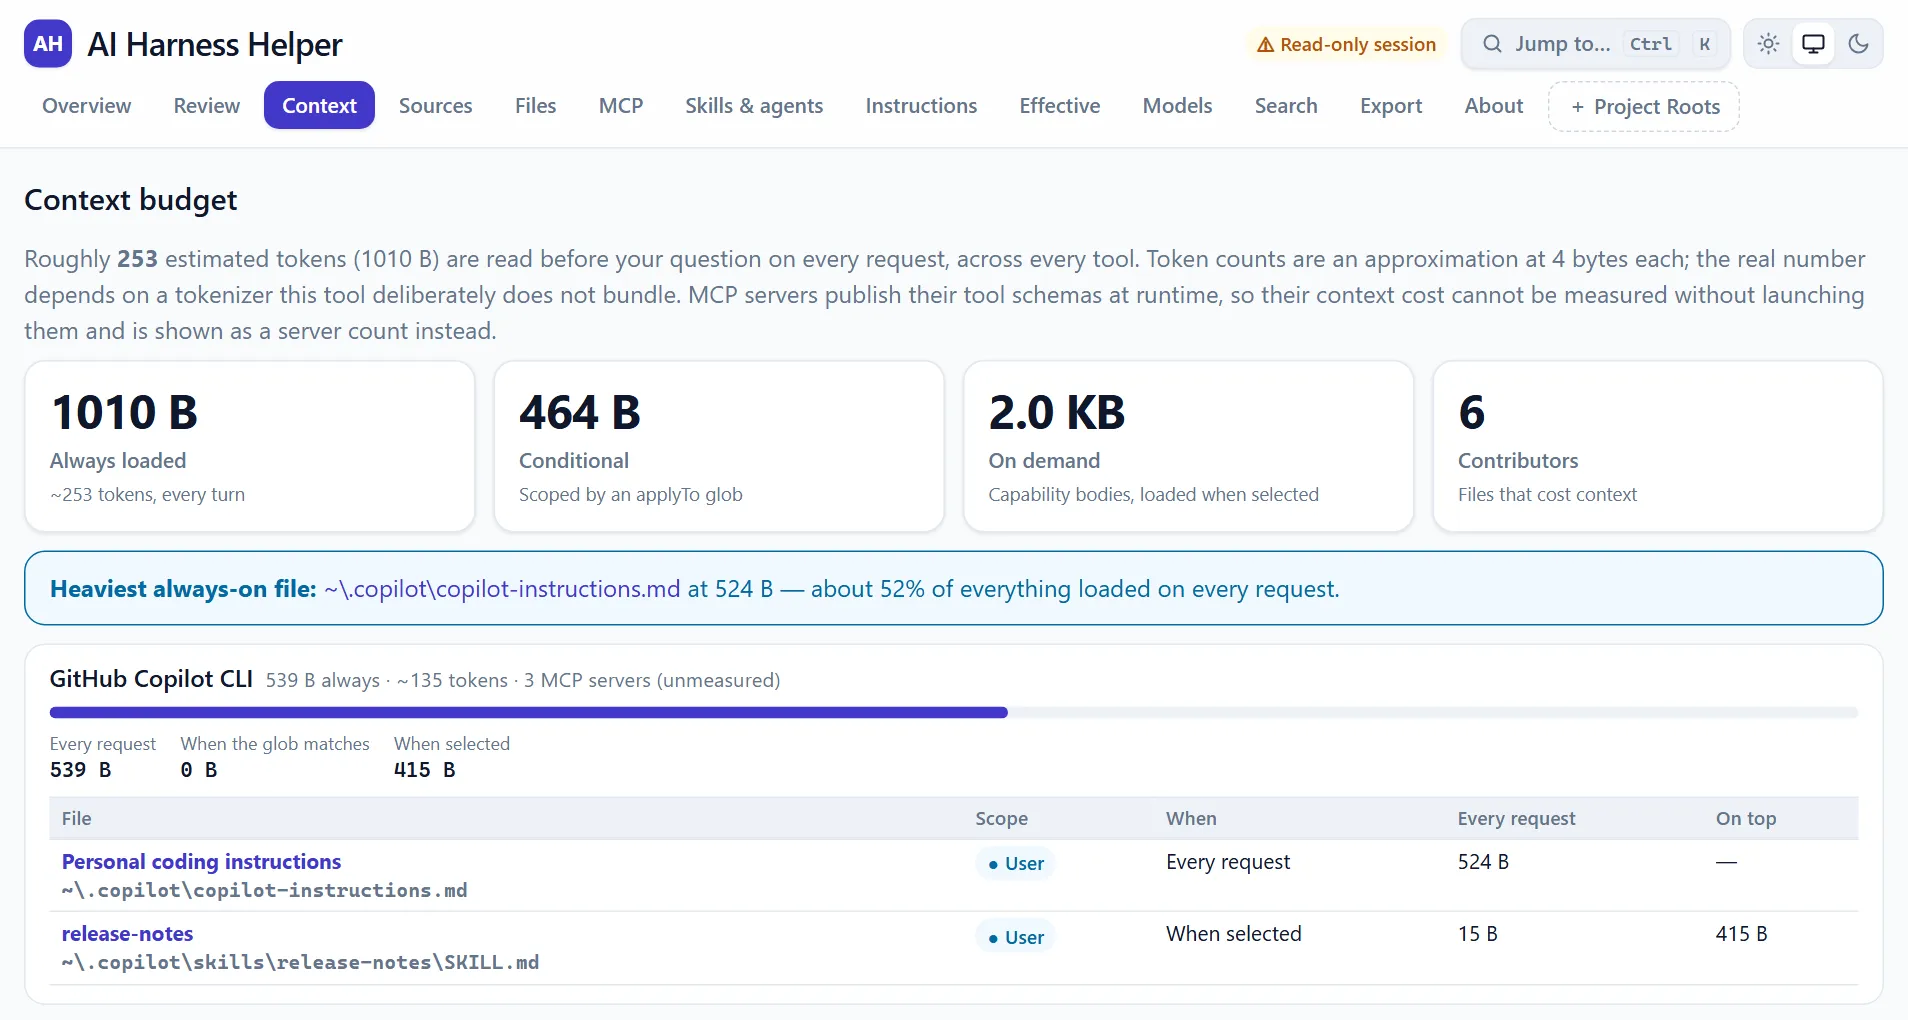
The screenshots use sample configuration in version 0.1.1, not my personal files. Their counts differ from the scan described below.
A note on who this is for: you don’t need to be a developer. I’ll define the jargon as it comes up, and anything with a dotted underline is a word you can hover over (or tap on a phone) for a plain-language definition. Try it: The written instructions that tell a computer what to do. It lives in ordinary text files..
What a harness includes
Your harness is the configuration around an artificial intelligence (“AI”) model. Instruction files telling it how you like things done. MCP servers giving it extra abilities. A reusable set of instructions you write once and the AI pulls in whenever it's relevant, like a recipe card it can reach for. and custom agents. Permission rules deciding what it’s allowed to run without asking.
Each tool has its own place for that configuration:
- GitHub Copilot’s command-line interface (“CLI”), which you use by typing
commands, uses
~/.copilot - Claude Code uses
~/.claude - Visual Studio Code has a
settings.jsonand anmcp.json, and a second copy of both if you also run Insiders - Cursor, Codex CLI, Windsurf, Gemini CLI, Docker, and Zed each have their own
- Projects you’ve copied to your machine may also have an
AGENTS.md,.github/copilot-instructions.md, or.mcp.json
To see the whole setup, you need to look across those locations.
How much context the instructions use
I wanted to understand more than which files were there. I also wanted to know how much text they added to a request.
Every request you send to an AI has a budget. The model can only hold so much text at once, called its The maximum amount of text an AI can consider at one time. Everything counts toward it: your question, your config files, the tool descriptions, and the answer being written., and your question shares that space with instructions and tool descriptions. Some instructions load on every request; others load only for certain files or tasks.
File size alone doesn’t tell you how often that text loads. The tool groups its estimates by when the content is used:
| Category | When it loads | Example |
|---|---|---|
| Always | Every request | Root instruction files, skill names |
| Conditional | Only when the work touches matching files | An instruction file scoped to *.ts |
| On demand | When the AI selects that capability | The full body of a skill |
That split matters more than the total. On my machine, the always-on cost came to roughly 2,728 The units used to measure how much text an AI processes. A token is often part of a word; its size varies with the text and the model., or 10.7 kilobytes (“KB”), across all tools. Meanwhile my Visual Studio Code Files the AI loads only when it needs them for the current task. content was 33.4 KB. About three times larger, but it only uses context when it’s loaded.
If I’d only seen one combined number, I’d have deleted the wrong thing.
Why?About the estimate
Token counts here are an approximation at four bytes per token. Getting it exact would require model-specific counting. I use the estimate to compare files and decide what to review, not to calculate a bill.
MCP context cost isn’t measured
Measuring the MCP tool descriptions would require connecting to the servers and reading what they provide. AI Harness Helper doesn’t launch them. It reports the server count and marks their context cost as unmeasured.
That leaves a gap in the estimate, but the inventory still helps you find duplicates. Two entries pointing at the same server are worth reviewing before you keep both.
What it actually found
Running it against my own setup, sanitized:
6 tools · 34 files · 18 directories · 27 MCP servers
Overview: 2 duplicates · 16 findings
Review: 97/100 (A), recorded from the original run
The findings were the useful part:
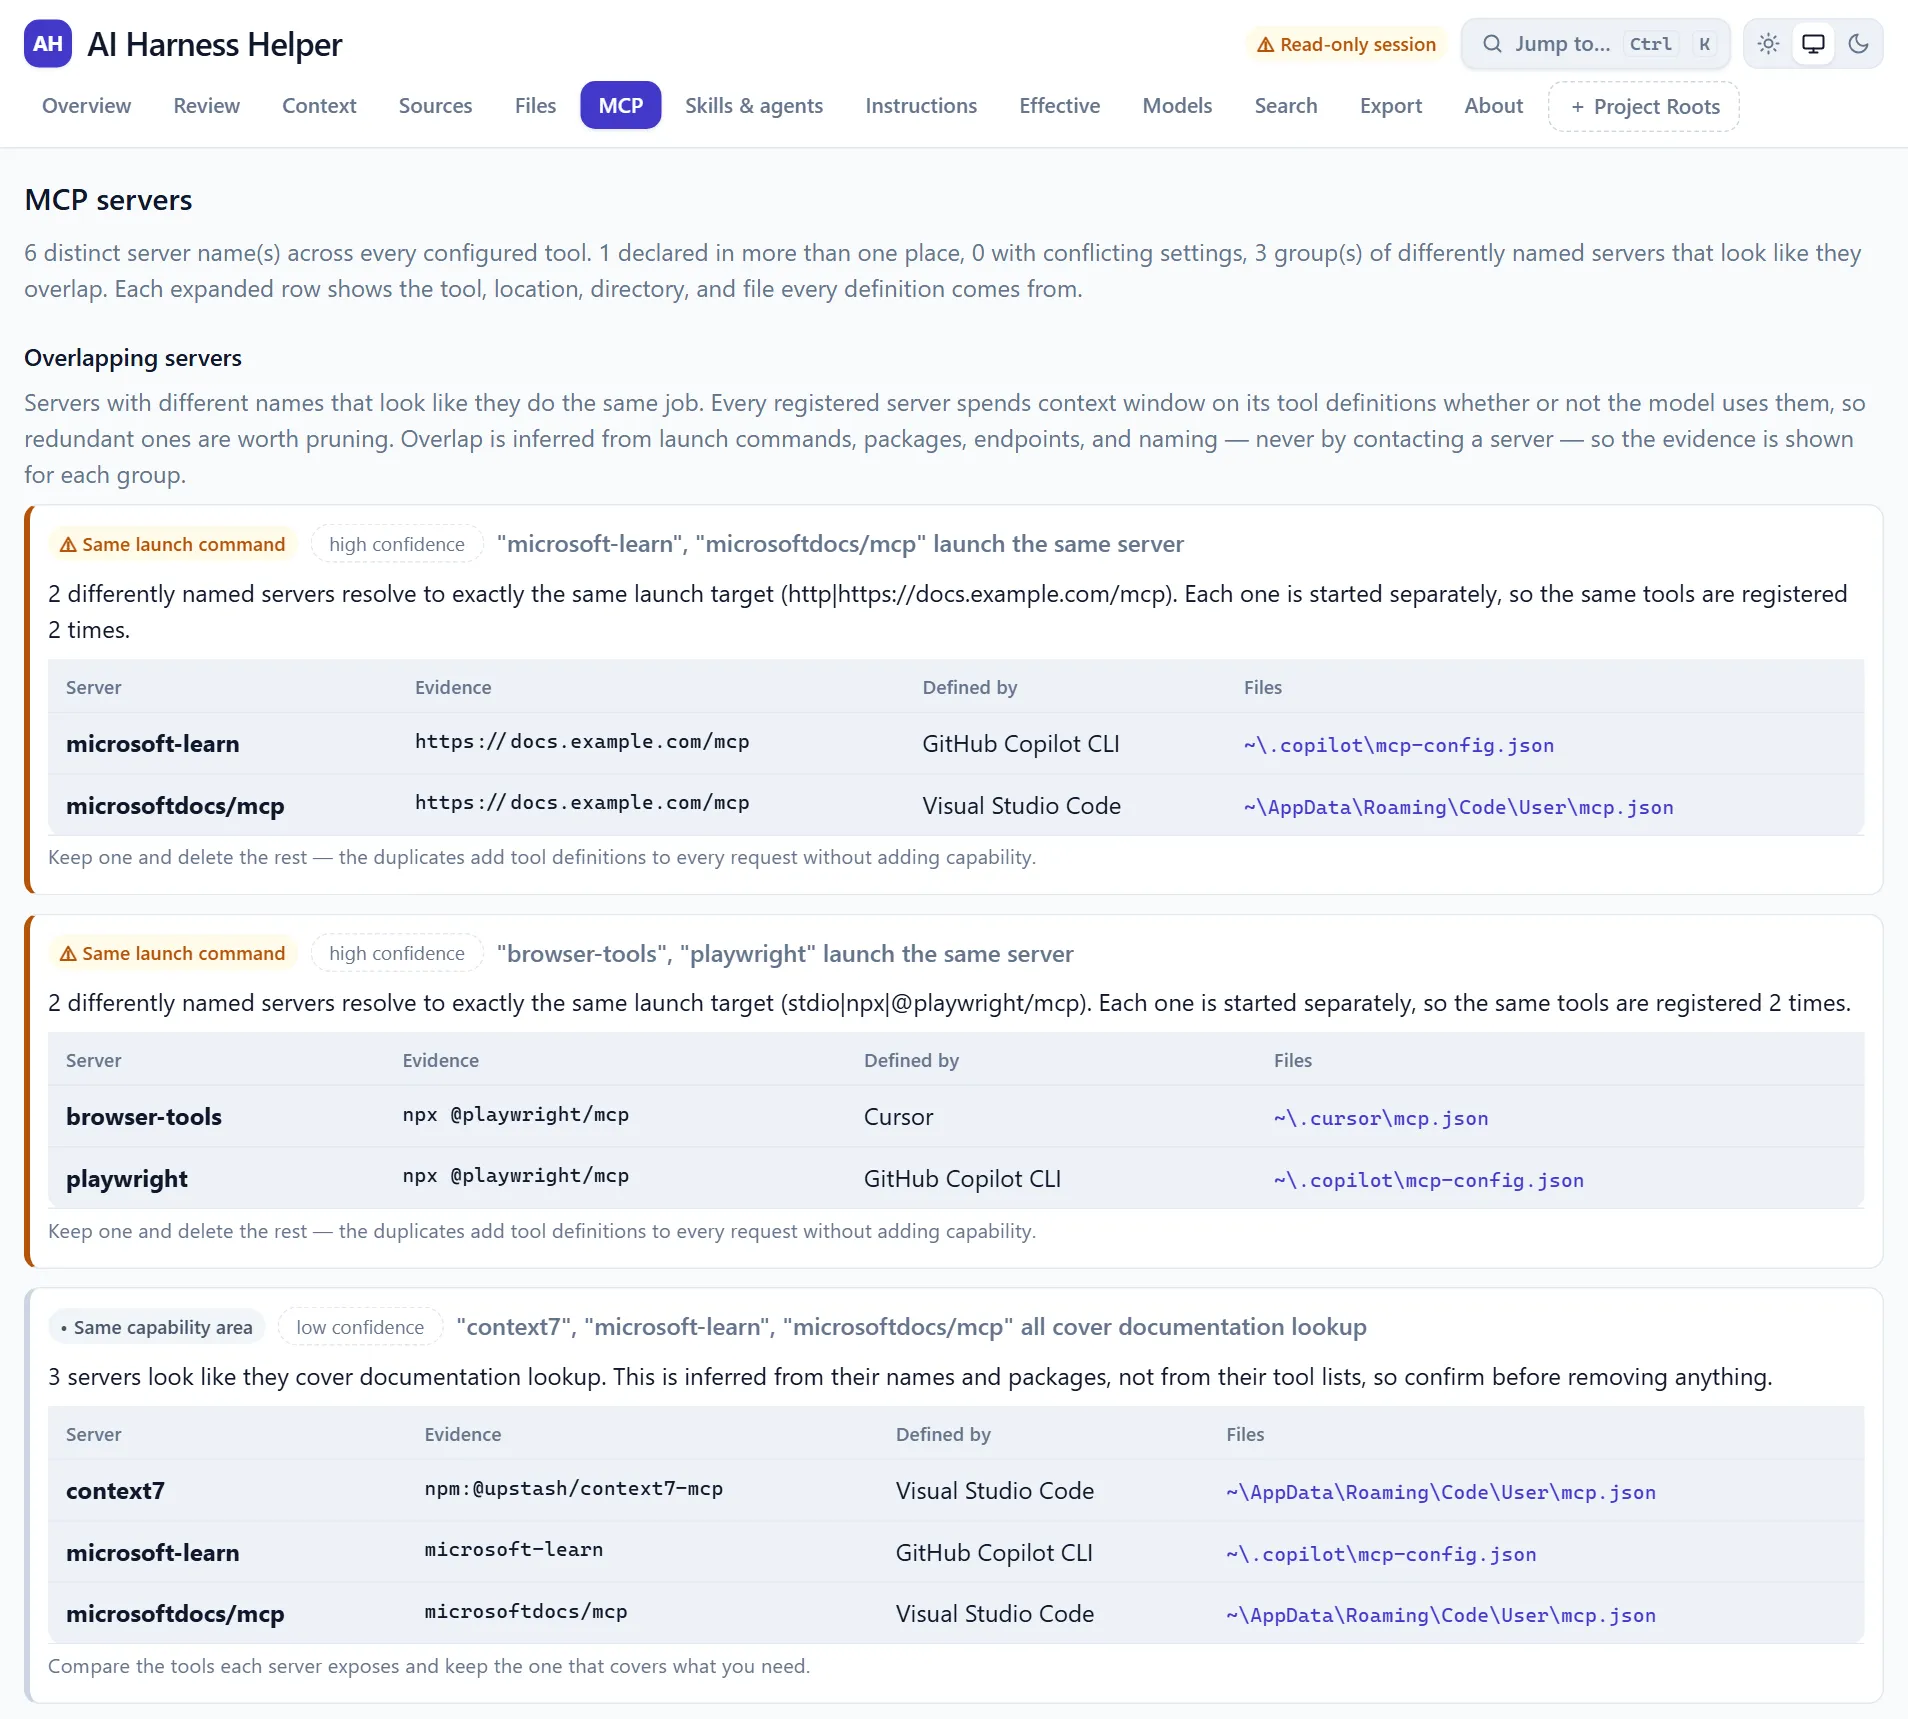
microsoft-learnandmicrosoftdocs/mcpresolve to the identical launch target. Same web address, two names, started separately, tools registered twice.- Four servers all cover documentation lookup (
context7,io.github.upstash/context7,upstash/context7,microsoft-learn). - Three cover GitHub. Three cover Azure. Three cover browser automation.
@playwright/mcpwas Not set to one specific version, so a later run may download a newer release., so a later run could download a release I hadn’t reviewed.- One chat mode file was missing the closing dashes around its settings, so Visual Studio Code was reading them as body text and seeing no name, description, or model at all. I have no idea how long it had been like that.
Why?What's 'front matter'?
A block of settings at the very top of a text file, fenced between two lines of three dashes. It’s how a file tells a tool its name, description, and which model to use. In the file I found, the missing closing dashes meant those settings were read as ordinary text instead.
I hadn’t noticed the missing settings before the scan. Having the finding tied to a specific file gave me somewhere to start.
What the A actually measures
That A doesn’t cover everything I just listed. In version 0.1.1, Overview findings and Review issues are separate lists. The 16 findings are not 16 deductions from the Review score. Duplicate servers and capability overlaps appear in the inventory, but they don’t directly lower that grade.
The scoring rules in version 0.1.1 start at 100 and subtract points for each Review issue:
| Review severity | Points deducted per issue |
|---|---|
| Error | 6 |
| Warning | 2 |
| Suggestion | 0.5 |
The result is rounded to the nearest whole number, with halves rounded up, and can’t go below zero. Anything from 90 through 100 gets an A. It isn’t a percentage of checks passed, and having an error doesn’t automatically prevent an A.
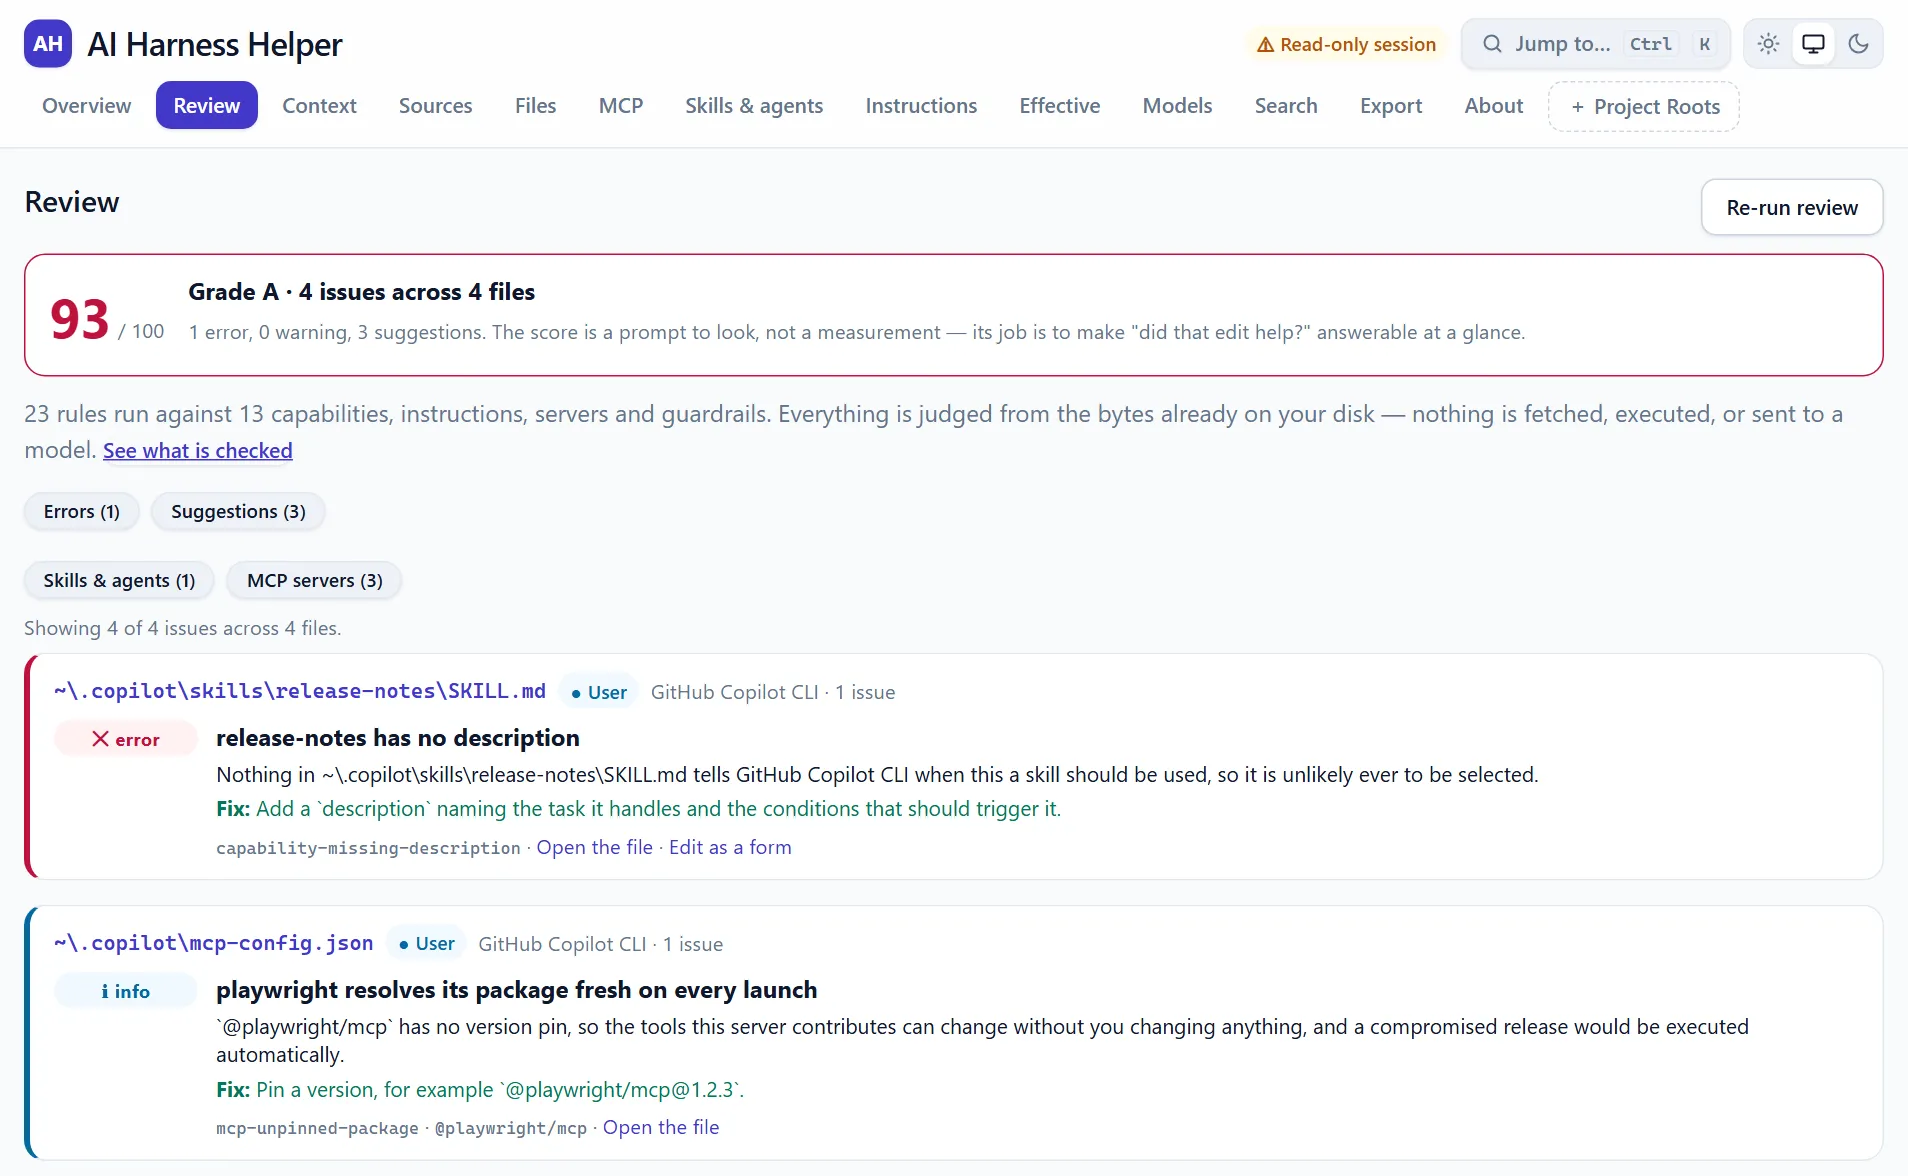
For example, the sample screenshot below shows one error, no warnings, and
three suggestions. That’s 100 - 6 - (3 × 0.5) = 92.5, rounded to 93: an A,
even though the missing skill description still needs fixing.
The rules also explain why the problems in my scan could leave a high score. Unclosed front matter is a warning, costing 2 points. An unpinned package is a suggestion, costing 0.5 points. Those weights are the tool’s choices, not a measure of how much a problem could affect my work. The original issue-by-issue Review export isn’t saved with this post, so I can’t independently reconstruct the reported 97 from the summary alone.
So the A means few weighted deductions under these rules, not that my whole setup is efficient, secure, or working correctly. The duplicate findings and unmeasured MCP context cost still deserve attention. I’d fix the named problems rather than use the letter as a reason to stop.
Installing it
For version 0.1.1, you copy the project from GitHub and run it locally. The
npx command in the README was the planned install method, but the package
wasn’t on npm, the public package catalog, when I ran these steps on Windows
before publishing.
You’ll need:
- Node.js 20.11 or newer (
node --versionto check) - pnpm, which you get with
npm install -g pnpmusing npm, the package manager included with Node.js - Git, which copies the project from GitHub and tracks changes to its files
Why?What are Node.js and pnpm?
Node.js lets your computer run programs written in JavaScript outside a web browser. pnpm is a package manager: it downloads the building blocks a project depends on. Both are one-time installs you’ll reuse for other projects.
Then, in a A text-based window where you type commands instead of clicking buttons. On Windows it's Windows Terminal or PowerShell; on a Mac it's Terminal.:
git clone https://github.com/russrimm/ai-harness-helper.git
cd ai-harness-helper
pnpm start
On first run, pnpm start downloads the code the project depends on and prepares
it to run. Give it a few minutes. It then scans your machine and opens the
interface in your browser. Later runs skip straight to the scan.
The default scan checks tool settings, not every project on your drive. To include project folders, name them explicitly:
pnpm start -- --project C:\repos\my-app --project C:\repos\other-appThe -- tells pnpm to pass the options that follow to AI Harness Helper.
Start in read-only mode
To review the findings without allowing changes to your files, use:
pnpm start -- --read-onlyThis blocks writes, deletions, and edits for the whole session. You can review what it finds before deciding whether to make changes.
Your first ten minutes
Four screens, in this order:
- Overview — tools and files found, along with duplicates, conflicts, exposed credentials, empty files, and settings in older locations.
- Review — 23 rules check skills, agents, instructions, server settings, and permission rules. Issues are grouped by file, and each one names its fix. The 0–100 score tracks those Review issues, not the separate Overview findings or the context budget.
- MCP servers — every server from every tool in one table, with the overlap groups. Each group shows its confidence and the evidence behind it, so you can distinguish a matching launch command from tools that cover a similar area.
- Context budget — estimated instruction size, grouped by when it loads.
Then do these three things:
- Review duplicate server entries. Where two names point to the same address, compare their settings and keep the one you intend to use. The tool removes the other entry from its settings file, preserving comments, setting order, and formatting elsewhere in the file.
- Pin your
npxpackages.@playwright/mcp@1.2.3, not@playwright/mcp. The version is an example; choose a release you’ve reviewed. Pinning keeps a later run from automatically selecting a newer release. - Limit specialized instructions to the files that need them. In tools
that support it, use an
applyTofile-matching pattern, such as**/*.tsfor TypeScript files, rather than loading those instructions on every request.
Then rerun the scan and check the relevant screen. Fixing a Review issue can raise the score; removing a duplicate changes the inventory; moving instructions changes the context budget. An improvement doesn’t have to change the grade.
How it handles sensitive files
These settings can contain credentials. Here’s how the tool handles access:
- The local server listens at
127.0.0.1, an address reachable only from your own computer, not other devices on your network. - Every request needs an access token generated fresh on each run.
- The API can only touch files the scanner already found. Everything else is outside its allowed file list.
- Values are masked when the setting name looks like a secret or the value matches a known credential format. You can reveal one value at a time; that choice isn’t saved.
- Credential stores —
~/.claude/.credentials.json,~/.codex/auth.json,~/.docker/config.json— are listed as present and never opened. Editing them is blocked outright. - Search masks credentials before matching, so queries don’t run against the hidden values.
- Every edit is backed up to
~/.ai-harness-helper/backups/. The tool writes the complete replacement rather than changing the file in place, and refuses the edit if the file has changed on disk since you loaded it.
The scan sends no usage data and makes no outbound network requests unless you
pass --check-updates. That option asks GitHub whether a newer release exists,
identifying the tool by its name and version.
Current limits
This post covers version 0.1.1. A few limits to keep in mind:
- Installation uses a local copy. The steps above use the GitHub project because the package wasn’t on npm when I ran version 0.1.1.
- MCP context cost is unmeasured, for the reason above.
- It won’t tell you which server is better. It tells you three of them look like they cover the same job and shows you why. You still need to decide which ones fit your work.
- The project is still changing. The interface and rules may differ in later versions.
Try it on your setup
The useful result for me wasn’t the score. It was finding duplicate entries and a chat mode file with missing settings, then knowing which files to review.
Run pnpm start -- --read-only and start with Overview. If you find a duplicate,
compare the settings before removing it. Then look at Context budget to see
which instruction files load on every request.
If you find something the tool should have caught and didn’t, open an issue with a sanitized example. Other setups will help me improve the rules.
Get the latest learnings
Occasional notes on Azure, AI, and cloud architecture. No spam, unsubscribe anytime.
Related articles
Customizing GitHub Copilot: A Quickstart for the Best Experience
A 20-minute quickstart for customizing the GitHub Copilot app as a non-coder: instructions, agent skills, MCP servers, custom agents, and plugins.
Coding with AI: A Neurodivergent Non-Coder's Guide to Building Real Apps
Field-tested lessons from shipping with AI: use plan mode, build reusable skills, choose models deliberately, and keep a reviewer in the loop.
Managing GitHub Copilot Credit Consumption
Manage GitHub Copilot credit consumption with usage reports, monthly budgets, focused prompts, model choices, and session limits that preserve quality.
Comments
Comments are hosted by GitHub Discussions. Loading them connects your browser to giscus.app and GitHub.