Vibe Code Your Blog, Part 2: Build It, Then Ship It to Azure
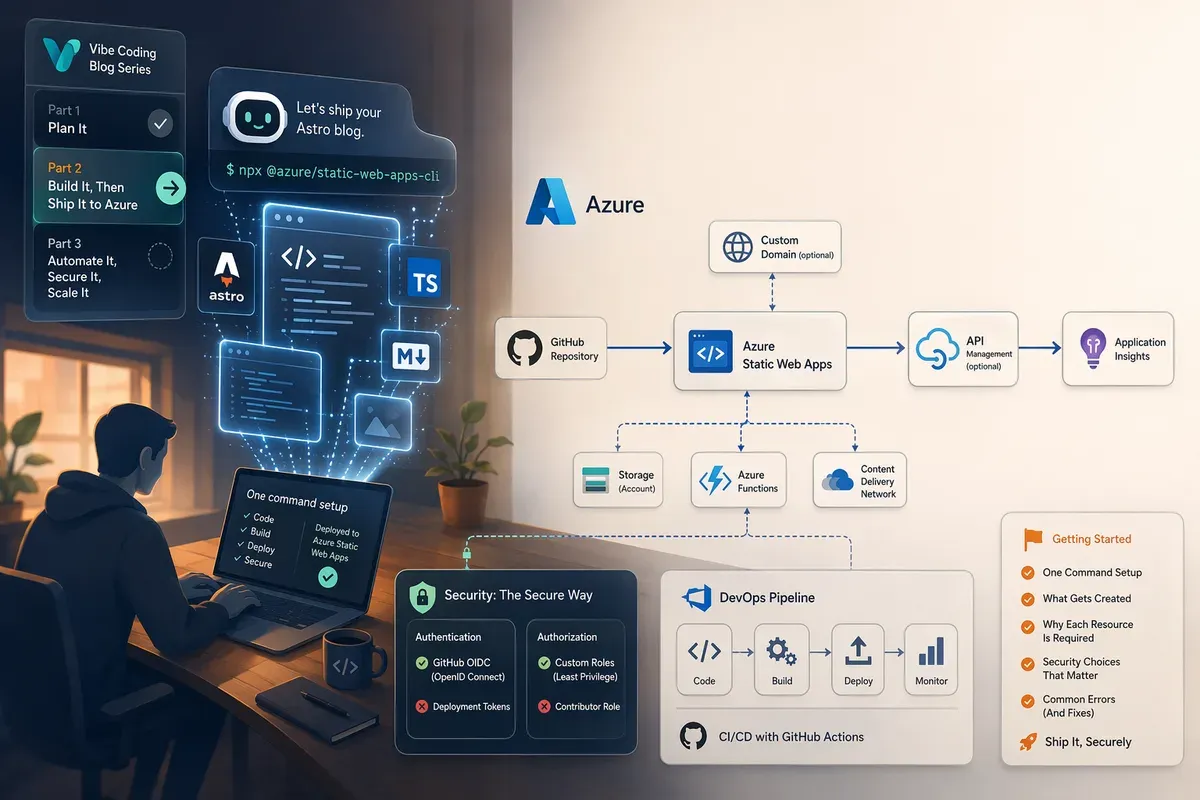
This post assumes you’ve completed Part 1: Vibe Coding 99-101 for non-coders, which covers all the prerequisites, tool installation, and project setup. If you haven’t worked through it yet, start there first.
Part 1 got the tools onto your machine. Nothing has been built yet, so that’s where this starts: you’ll create the blog, teach Copilot how your project works, put it on GitHub, make your first change through the agent, and then deploy it to Azure Static Web Apps the secure way, with everything provisioned for you.
I’m writing this the way I wish someone had written it for me. When I first did this, I hit a wall of confusing errors: an empty-secret login failure, an MFA “claims challenge,” an authorization error deep inside a deploy step. You won’t have to guess through any of that. There’s a single command that stands up every Azure resource, and then a plain-language explanation of what each piece is, why it’s required, and what the security trade-offs are.
Why?Do I need to be a cloud engineer for this?
No. You need the Azure account you created in Part 1 and the ability to run two sign-in commands. The script does the rest. The long explanations after it are optional; read them when you want to understand why, not because you need to type any of it.
What you’ll end up with
- An Astro blog you created, running on your own machine
- A
.github/copilot-instructions.mdso Copilot stops guessing about your project - A GitHub repository holding all of it, with full history
- A live Azure Static Web App serving it on
https://<something>.azurestaticapps.net - A GitHub Actions pipeline that rebuilds and redeploys every time you push to
main - No long-lived deployment credential stored in GitHub: the workflow uses OIDC to sign in to Azure, then retrieves the Static Web App’s deployment token just in time for each Static Web Apps action
Step 1: Create the project
You need a blog to deploy before you can deploy a blog. Astro’s official blog template gives you a working one in about a minute.
Open a terminal, move to wherever you keep projects (cd Documents, or wherever
suits you), and run:
npm create astro@latest -- --template blogWhy?What are those two dashes doing in the middle of the command?
They’re a separator, and they’re only needed with npm. Without them, npm thinks
--template blog is an instruction for npm itself rather than for the Astro
setup wizard, and quietly ignores it. The -- means “everything after this
belongs to the thing I’m running, not to me.” If you use pnpm or yarn instead,
you don’t need it.
The wizard asks a few questions. Where should the project live (it creates the folder for you), whether to install dependencies, and whether to start a Git repository. Say yes to installing dependencies and yes to Git.
Why?What did 'install dependencies' just do?
A A ready-made building block your project uses instead of writing that piece yourself. A typical site relies on dozens of them.
is code someone else wrote that your project relies on. Astro itself is one.
Saying yes downloads all of them into a folder called node_modules, which is
large and gets rebuilt from scratch on any machine, which is why it never gets
committed to Git. The exact versions it picked are recorded in a file called
package-lock.json, and that does get committed, so everyone building your
site gets an identical set.
Move into your new folder and start it up:
cd your-blog-folder
npm run dev
Open http://localhost:4321 in a browser and you have a
working blog running on your own machine. Nobody else can reach it yet;
localhost means “this computer only.” Press Ctrl + C in the terminal to
stop the server when you’re done looking.
Why?Why is Astro the pick here?
Because it produces plain HTML files. There’s no database to secure, no admin login to get breached, and no server-side code running between your visitors and your writing. That makes it fast, essentially free to host, and about as small an attack surface as a website can have. It’s also genuinely pleasant to write in: posts are just Markdown files in a folder.
Step 2: Open the project in Copilot and tell it about itself
Open the GitHub Copilot app and add the folder you just created as a project.
Before you ask it to change anything, spend five minutes on the file that does
more for you than anything else in this series: .github/copilot-instructions.md.
This is a plain English file that Copilot reads on every request in this project.
It’s how you stop it guessing about things it has no way to know.
You don’t have to write it by hand. Start a session and ask:
Create .github/copilot-instructions.md for this project. Read package.json
and the folder structure first so it's accurate. Cover: the package manager
and exact install command, where blog posts live, the one command that
verifies a change works, and a rule that security comes first — no secrets
in code, and never weaken a check just to make it pass. Keep it under 300
words. Show me the file before you save it.
Read what it produces. Correct anything wrong. For a stock Astro blog template
the true answers are roughly: install with npm ci rather than npm install,
posts live in src/content/blog/, and npm run build has to finish without
errors before any change counts as done.
Why?Why does `npm ci` matter more than `npm install`?
npm install is allowed to go looking for newer versions of your dependencies
and quietly update that package-lock.json file. npm ci installs exactly what
the lockfile already says, every time. On a project you’re sharing with a build
pipeline, “exactly what we agreed on” is what you want, because a dependency that
silently changed version between your laptop and the cloud is a genuinely
miserable bug to chase.
Instructions pay you back faster than any other setup you can do, and there’s a lot more of it worth knowing: global instructions, reusable skills, MCP servers, and custom agents. I wrote that up separately in Customizing GitHub Copilot. Come back here when you’re done, or carry on and read it later.
Step 3: Put it on GitHub
Right now your blog exists on exactly one computer. Let’s fix that.
The Astro wizard already started a Git repository locally, so you have version history. What you don’t have is a copy on GitHub. From inside your project folder:
git add .
git commit -m "Initial blog from Astro template"
gh repo create my-blog --public --source=. --remote=origin --push
That last command creates the repository on GitHub, connects your local folder to
it, and pushes everything up in one move. Swap my-blog for whatever you want
the repository called, and use --private instead of --public if you’d rather
keep it to yourself for now.
Why?Public or private?
Either works for this series, and you can switch later. Public means anyone can read your source (not a problem: it’s a blog, the content is meant to be read) and it’s required if you ever want free GitHub Pages hosting. Private keeps it to you. The one rule that matters in both cases is the same: no passwords, keys, or tokens in the files you commit. A private repository is not a safe place to keep a secret, it’s just a less public one.
Confirm it worked:
gh repo view --webThat opens your new repository in a browser. Your writing now lives in two places, and every change from here is recoverable.
Step 4: Make your first real change, using plan mode
Now the part you came for. Back in the Copilot app, look at the dropdown below the prompt box: it sets how much freedom the agent has. There are three settings.
- Interactive: the agent suggests changes and waits for you before it moves on. This is the default and it’s the right one most of the time.
- Plan: the agent writes up what it intends to do and waits for you to approve the plan before it touches anything.
- Autopilot: the agent works straight through on its own, writing and testing without checking in.
Pick Plan and ask for something real:
Add an About page to this blog with a short bio and a link to my GitHub
profile, matching the styling of the existing pages.
You’ll get a plan back rather than a pile of changed files. Read it. This is the moment where you catch a misunderstanding for free, before any code exists. If the plan says it’ll rewrite your homepage layout and you only asked for a new page, say so and make it try again. When it looks right, approve it.
Then check the work: read the diff it produced, run npm run dev, and look at
the page in a browser. If it’s good, commit it.
Commit this with a clear message and push it.Why?When would I use Autopilot, then?
Once you trust a particular kind of task and the cost of it going wrong is low. Bulk renaming, fixing a failing build, applying a change you’ve already reviewed the plan for. What makes it safe isn’t bravery, it’s Git: if you committed before you started, the worst case is you throw the changes away and you’ve lost ten minutes. Starting a risky task from an uncommitted mess is what turns a bad agent run into a bad afternoon.
Why?The agent says it's finished, but is it?
Ask it to prove it. “Run npm run build and show me the output” turns a claim
into evidence. An agent that says a change is done without ever running the
project’s own check is guessing, and this is exactly the habit that the
copilot-instructions.md file from Step 2 is meant to enforce automatically.
Step 5: Build the site locally
Before you deploy anything, make sure it builds. From your project folder:
npm install
npm run dev     # live preview at http://localhost:4321
npm run build   # produces the production site in dist/
npm run dev is your writing loop: edit a post, watch it update instantly.
npm run build is the real test: it’s exactly what the cloud will run. If it
builds clean locally, it’ll build clean in the pipeline.
Why?What is a 'build,' and why isn't my Markdown just… the website?
Your posts are A lightweight way to write formatted text — headings, links, bold — that's easier to read and write than HTML.,
and the site uses A modern web framework that turns your content and components into fast, plain HTML at build time..
A build compiles your posts, layouts, styles, and images into plain HTML, CSS,
and JavaScript in a dist/ folder. That folder is what actually gets served to
visitors. Building ahead of time is why the site loads fast and has almost
nothing to attack at runtime.
Step 6: Deploy to Azure, the easy way
You need one file that isn’t in the Astro template: the setup script that
provisions your Azure resources. Grab
setup-azure-swa.sh
and
.github/workflows/azure-static-web-apps.yml
from this blog’s repository and drop them into the matching folders in your own
project. Or point Copilot at those two links and ask it to adapt them for your
repository, which is the more interesting option and a good test of everything
you set up in Step 2.
The script reads its settings from environment variables and works out your repository name from the GitHub CLI, so you don’t need to edit it. You do need to override the defaults, or you’ll create resources named after my blog.
Sign in to both services, then run it:
az login        # or: az login --use-device-code  (headless containers)
gh auth login   # choose GitHub.com, HTTPS, and authenticate in the browser

SWA_NAME=my-blog RESOURCE_GROUP=my-blog-rg LOCATION=eastus2 \
./scripts/setup-azure-swa.shWhy?I'm on Windows and that script won't run.
It’s a bash script, and Windows doesn’t speak bash natively. You already have
what you need, though: installing Git in Part 1 also installed Git Bash.
Right-click your project folder, choose Open Git Bash here, and run the
command there. The alternative is
WSL, which gives you a full
Linux environment on Windows via wsl --install. Git Bash is the smaller step
and it’s enough for this.
Why?Do I need the `api/` folder this repo has?
No. This blog has a small api/ folder powering the newsletter sign-up form,
and the workflow deploys it alongside the site. A stock Astro blog template
doesn’t have one, and the deploy handles its absence fine: there’s simply nothing
to publish there. Add one later if you ever want a form that does something.
That’s it. The script is idempotent: safe to run again if something was
half-finished, and it prints each step as it goes. When it’s done, it hands you
the live URL. Push to main and the site deploys automatically.
Why?Why do I have to sign in first — can't the script do it?
Signing in is the one thing a script (or an AI agent) genuinely can’t do for
you: it needs your browser and your second factor. az login and
gh auth login prove you are you. Everything after that is just API calls
the script can make on your behalf. In a headless environment, use
az login —use-device-code so you can complete sign-in on any
device.
Heads-up on permissions. The script creates a custom role and assigns it, which requires Owner or User Access Administrator on your subscription or resource group. Creating the app registration needs a directory role that can register apps (Application Developer or higher). If you’re on a locked- down corporate tenant, you may need an admin to run one or two steps, and the script stops on the first failure and tells you which one. On a personal Azure account created in Part 1, you already have everything you need.
Step 7: Understand what just happened (and why it’s secure)
The script created six things. None of it is magic, and every choice was made for a security reason. Here’s each one, in plain language.
1. A resource group
A A logical container in Azure that holds related resources so you can manage, secure, and delete them together. is just a folder for your Azure resources. Everything for the blog lives in one, so you can see it all in one place and delete it all in one click if you ever want to start over.
Why it’s required: every Azure resource must live in a resource group.
Security angle: grouping resources lets you scope permissions and policies to just this blog instead of your whole subscription. Smaller blast radius.
2. A Static Web App (Free tier)
This is the actual hosting service. It serves your built HTML globally and runs
the small /api function behind the newsletter form.
Why it’s required: it’s the thing visitors connect to.
Security angle: Static Web Apps serves pre-built static files, so there’s no database, CMS admin panel, or long-running front-end process to patch. This blog does still have a managed Azure Functions API for newsletter sign-up, so that endpoint remains runtime code and needs the same input validation, dependency patching, and monitoring as any other API.
Why?Free tier — what's the catch?
For a personal blog, essentially none. The Free tier includes global distribution, free SSL certificates, and custom domains. You step up to Standard only if you need things like private endpoints, a bring-your-own Azure Functions backend, or an SLA. Start Free; upgrade if you ever outgrow it.
3. A dedicated deployment identity
The script creates an An identity in Microsoft Entra ID that represents an application or automation, rather than a human user. and its The account that actually gets permissions assigned to it — the app registration's presence inside your tenant.. This is the identity your GitHub Actions pipeline “becomes” when it talks to Azure.
Why it’s required: something has to authenticate to Azure to deploy. That something should not be you personally.
Security angle: this is a big one. Using a dedicated, non-human identity means:
- If it’s ever compromised, you revoke it, not your personal account.
- Its access is scoped to exactly one job (more on that below), so it can’t wander around your subscription.
- Every action it takes is auditable and attributable to the pipeline.
Compare that to the old-school alternative: pasting a shared deployment key into a settings box. Keys leak, get committed by accident, and never expire on their own. A dedicated identity is strictly safer.
4. Two federated credentials (the secret-less part)
This is the cleverest and most secure piece. Instead of giving GitHub a password or key, we set up A trust relationship where one system accepts short-lived identity tokens issued by another, instead of a shared secret..
Here’s the flow: when the pipeline runs, GitHub mints a short-lived token that
says, in effect, “I am the main branch of your-repo.” Azure has been told to
trust that exact statement, and only that. It exchanges the token for temporary
Azure access that expires in minutes.
We create two of these trust rules: one for the main branch (real deploys)
and one for pull requests (preview builds).
Why it’s required: it’s how GitHub proves who it is without a stored secret.
Security angle: this is the headline:
- No long-lived Azure credential is stored in GitHub. Azure still creates a resettable deployment token for the Static Web App. The difference is that this workflow leaves the durable token in Azure instead of copying it into a repository secret.
- Tightly scoped trust. Azure only accepts a token whose subject exactly matches
repo:your-org/your-repo:ref:refs/heads/main(or:pull_request). A different repo, a different branch, or a fork can’t impersonate your pipeline. - Short lifetime. Even the temporary token that is issued is useless minutes later.
Why?OIDC vs. a deployment token — what's the actual difference?
A Static Web App deployment token is a persistent credential Azure creates for deployment. The common setup copies it into GitHub secrets, where anyone who reads it can deploy until you reset it. OIDC federation removes the stored Azure sign-in credential from GitHub: GitHub proves its identity on each run, receives a short-lived Azure token, and uses that access to retrieve the Static Web App deployment token just in time. The deployment token still exists in Azure; the safer part is not keeping another durable copy in GitHub.
5. A custom, least-privilege role
The deploy action still needs the Static Web App’s deployment token to publish files, but instead of storing that token, the pipeline reads it fresh at runtime using the identity we just created. To do that, the identity needs exactly one permission: read this one app’s deployment secret.
Rather than hand it a broad built-in role, the script creates a custom role
that allows only Microsoft.Web/staticSites/listSecrets (and read) on this one
Static Web App.
Why it’s required: fetching the token at runtime needs a permission, so we grant the smallest one that works.
Security angle: least privilege in action:
- The obvious shortcut is the built-in Contributor role. It works, but it lets the identity create, modify, and delete resources: far more than “read one token.” If that identity were ever misused, Contributor is a bad day.
- The custom role can do literally one thing on one resource. Even fully compromised, it can’t spin up crypto-mining VMs, read other resources, or touch anything outside this blog.
- Scoping to the single Static Web App (not the resource group or subscription) is the tightest boundary Azure offers.
Why?Why fetch the token at runtime instead of just storing it?
Storing the deployment token would put a second durable copy of that credential in GitHub. Fetching it each run means your GitHub settings hold only identifiers, while Azure remains the source of truth for the resettable token. The workflow’s copy exists only during the job and is masked in the logs.
6. Non-sensitive configuration in GitHub
Finally the script stores three secrets: AZURE_CLIENT_ID,
AZURE_TENANT_ID, AZURE_SUBSCRIPTION_ID, and two variables: SWA_NAME
and SWA_RESOURCE_GROUP.
Why it’s required: the pipeline needs to know which identity to sign in as and which app to deploy to.
Security angle: despite living in “secrets,” these three values are not passwords; they’re public-ish identifiers (GUIDs). They tell the workflow who to authenticate as, but they grant no access on their own; the actual authentication still requires the OIDC trust from item 4 above. They’re kept in secrets mostly to keep them tidy and out of logs, not because exposure would be dangerous.
What the pipeline actually does
Open .github/workflows/azure-static-web-apps.yml
and you’ll see the whole flow in plain YAML. On every push to main, it:
- Checks out your code and installs dependencies.
- Builds the site (
npm run build→dist/). - Signs in to Azure with OIDC, no secret, using the federated identity.
- Reads the deployment token at runtime with the least-privilege role, and immediately masks it from the logs.
- Deploys the built
dist/and theapi/to your Static Web App.
Pull requests from branches in your repo get their own preview deployment; when the PR closes, that preview is torn down automatically.
Why?Why don't pull requests from forks deploy?
A fork can’t be issued an OIDC token for your repo’s identity, by design.
That’s a feature, not a bug: it means a stranger’s pull request can never
authenticate as your pipeline or reach your Azure resources. Pushes to main
and PRs from branches in your own repo work normally.
Security scorecard
If you’re weighing options, here’s how the choices in this setup stack up:
| Choice | Alternative | Why this is safer |
|---|---|---|
| OIDC federated identity | Stored Azure client secret | No long-lived Azure sign-in credential in GitHub; the OIDC token is short-lived and scoped to one repo/branch. |
Custom listSecrets-only role | Built-in Contributor | Identity can do one thing on one resource, not manage your subscription. |
| Fetch token at runtime | Store token in GitHub secrets | Azure keeps the durable deployment token; GitHub stores identifiers instead of another credential copy. |
| Dedicated deploy identity | Personal account / shared key | Revocable, auditable, and blast-radius-limited. |
| Static front end + managed API | Server-rendered front end | Smaller front-end runtime surface; the managed /api function still requires normal API hardening. |
The errors I hit, so you don’t have to
Every one of these is a real error from setting this up. If you see one, here’s what it means.
azure/login@v2 fails: “Ensure ‘client-id’ and ‘tenant-id’ are supplied.”
Your AZURE_* secrets are missing or empty. Re-run the setup script, or set the
three secrets by hand, then re-run the workflow.
AADSTS50076: ... you must use multi-factor authentication during
az login. A A policy that can require extra verification (like MFA) before granting a token for a specific resource.
policy wants MFA for the management API. Re-run the exact az login command Azure
prints in the error (it includes a one-time claims challenge) and complete MFA in
the browser.
AuthorizationFailed ... listSecrets inside the Deploy job. The identity
can’t read the deployment token yet; the role assignment hasn’t propagated, or
it’s missing. Give it a minute and re-run; if it persists, re-run the setup
script’s role step.
Failed to find a default file in the app artifacts folder. The deploy is
looking in the wrong place for index.html. With a pre-built site, the action’s
app_location must point at your build output (dist), which this repo’s
workflow already does.
You’re live
Push a commit to main, watch the Actions tab go green, and open your
azurestaticapps.net URL. From here the fun part is just… writing. Want a custom
domain? Azure Static Web Apps gives you free managed certificates. Add your
domain in the portal and point a CNAME at it.
That’s the series: Part 1 set up the workshop, Part 2 built the thing and shipped it. If you want to go further on the AI half, the next thing I’d read is Customizing GitHub Copilot, which covers the skills, MCP servers, and custom agents that make the agent genuinely good at your project rather than projects in general.
Now go write something.
Get the latest learnings
Occasional notes on Azure, AI, and cloud architecture. No spam, unsubscribe anytime.
Related articles
Microsoft Communications Portal: One Feed for Every Microsoft Update
What the Microsoft Communications Portal is, how it aggregates Power Platform, Microsoft 365, Azure, and Fabric update feeds into one dashboard, its defense-in-depth security model, deployment options with Azure Developer CLI or Docker, and how to contribute on GitHub.
An Hour with Azure SRE Agent
What Azure SRE Agent is, what setup actually looks like, and what happened when I pointed it at my own repo, my Application Insights telemetry across Dataverse, Copilot Studio, and Foundry, and then asked it for a health check on everything at once. Plus what connecting an incident platform buys you — autonomous mitigation, a verification loop, and a handoff straight to the GitHub Copilot coding agent — the five switches worth flipping that you don't get turned on by default, and what the newly published Zero Ops framework recommends, including the two governance layers above per-tool Allow and Ask and three details worth verifying against the current docs.
Power Apps Code Apps: Your Code, Power Platform's Guardrails
Code apps let you build a React or Vue app in your own IDE and run it on Power Platform, with Entra ID sign-in, 1,400+ connectors, and DLP handled for you.
Comments
Comments are hosted by GitHub Discussions. Loading them connects your browser to giscus.app and GitHub.